Home | Tag Archives: Fish Health

Tag Archives: Fish Health

Feed Subscription

Dip Treatments For Fish And Corals

We all know that washing our hands and bodies helps control germs and diseases but what about in our aquariums? Fish and corals may not have hands to wash but we still have a similar option: Dips and Baths. We use these to remove parasites and pests or treat for some conditions and infections. A “dip” – whether it is for fish or corals – involves removing the organism from the aquarium and placing it in a separate container with the dip solution for a short period of time before putting it back into the tank. Similarly, a milder treatment known as a “bath” uses a weaker solution for a longer period of time. 


The type of dip or bath that is right for you depends on what you are treating. In this article, we are going to cover the most common dips: Freshwater dips for saltwater fish, dipping corals using Iodine or a commercial coral dip. For information on using dips to remove pests from freshwater aquarium plants, see our article Dipping Plants To Eliminate Snails for the different options available.


Freshwater Dips For Saltwater Fish 


Putting a saltwater fish into freshwater may seem like a risky move – and it is if done incorrectly – but when done properly, it can be useful in removing parasites like Flukes and some Protozoans. The keys here are preparation, timing and observation. It isn’t as easy as dropping your clownfish into your goldfish tank! You can use this method for new arrivals before adding them to your tank or to treat fish from a display or quarantine tank.
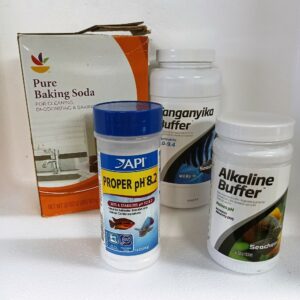
1. Prepare your dip container and water. The container should be clean and free from any detergents or waste and large enough for your fish to swim comfortably. Use clean, dechlorinated freshwater that is the same pH and temperature as your aquarium….this is key! You may need to use a buffer like baking soda or high range buffers for African cichlid tanks to raise the pH to match your aquarium, but make sure it is as close as possible. Adding your saltwater fish to freshwater with a much lower pH (for example, a neutral 7.0 when your aquarium pH is 8.4) is very stressful.

2. Once your water is prepared, carefully move the fish from the aquarium into your dip container. If you are using a net, be especially careful around any fish with spines that may get caught or damaged.

3. Continue to observe your fish in the dip. If you see (or suspect) parasites like Flukes, you can use an eyedropper or turkey baster to gently blast water onto your fish to help knock off any parasites.

4. If you notice any strong signs of stress, remove the fish from the dip and get it back into saltwater right away. Otherwise, a minimum of 5 minutes will help remove most parasites, and most fish can typically tolerate a dip up to about 10 minutes.

5. The dip water can be reused for several dips if you have multiple fish to treat, but dispose of the water after you are finished and rinse your container for next time. 


Dipping Corals


Dipping corals can help remove pests and parasites as well as treat a number of infections and conditions. Many brands of coral dip solutions are available on the market and typically use ingredients like botanical oils to kill or dislodge pests from corals. Iodine can also be used in some situations, especially when treating new frags or damaged colonies with tissue that can be vulnerable to infection. When choosing a dip, be sure to read the instructions as some dips can’t be used on some types of corals and concentrations or timing can vary from brand to brand. The instructions here are a basic guideline for most corals and dips.
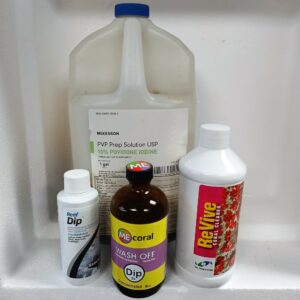
1. Prepare the containers for your dips. These dips should always be done in a separate container but can usually be done with either water from the tank (if you can safely remove enough for the dip) or with freshly prepared saltwater. The container should be big enough to completely cover the corals being dipped but doesn’t need to be larger than necessary to avoid wasting your dip to reach the proper concentration.

  • Depending on the dip and concentration you are using or the corals you are dipping, you may want to prepare a second container to “rinse” your corals after the dip. This should be about the same size and amount of water and can also be either tank water or fresh saltwater.

2. Add your dip solution to the water before adding the coral. This makes it easier to mix the solution throughout the dip container without dumping it directly onto the coral. Most dips have recommended concentrations like 1 teaspoon per gallon of water but can usually be adjusted depending on the coral; use a weaker solution for more sensitive or stressed corals or stronger solution for resistant pests or very hardy corals.

  • For Iodine dips, you can use the color to determine the strength. On a white background, a weak Iodine solution should be about the pale tan of a manila envelope. A strong Iodine dip would be a rusty red-brown but the corals should still be visible. Avoid a concentration so strong that you can’t see through it.
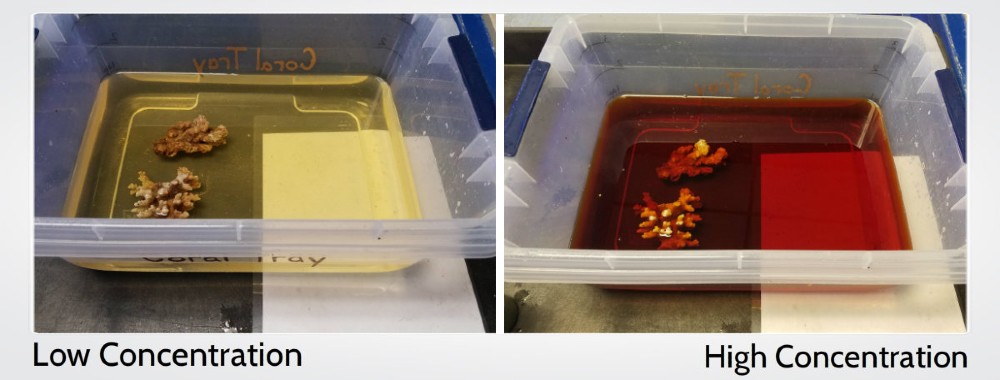
Iodine Dip Concentrations

3. Add the coral to the dip and follow the instructions on your dip. Most corals can be dipped for 5-10 minutes but if the coral appears very stressed or starts releasing a lot of slime, remove it from the dip. Hardy corals like polyps or milder solutions may be dipped for longer.

4. After the dip, rinse your coral in the dip by gently “swishing” it around underwater. If you prepared a rinse container, you can do the same in this container as well. This is especially useful after strong Iodine dips or with especially mucus-y corals.

5. Replace your corals back into the tank and dispose of your dip and rinse containers….don’t add this water back into your tank! 


When done properly, these dip methods can help keep your tank parasite- and pest-free without the need to medicate the entire tank, or to supplement a medication regime. Feel free to contact us if you aren’t sure if a dip is right for you!


Maintaining Aquarium Temperatures for Fish Health

Cichlid with ichMaintaining proper aquarium temperatures is essential for the health and well-being of your fish. While aquarium heaters do a pretty good job at this, the probability of fluctuations from fall through spring tends to be greater and possibly more detrimental. You may not even realize how much the temperature of the water changes through the day or day-to-day until you’re faced with ich or some other problem in your aquarium.

The Threat of Cool Temperatures

While our aquarium fish will rarely if ever be exposed to near or below freezing temperatures in the safety of your home (hopefully), fish farmers in Florida can attest to the immediate and lingering problems that can come with even short exposure to cold temps. Exposure to temps below 60 F can create chaos in a tropical tank, so you can imagine what freezing temps do to tropical fish housed in an outdoor setting. Sensitive fish may be killed outright from the shock of extreme temperatures or fluctuations in temperatures. Others face blows to their immune systems and the increased chance of being infected by opportunistic parasites, fungi or bacteria. These organisms take advantage at the slightest sign of stress on the part of tropical fish, and can decimate the population in a short amount of time. Cooler temperatures tend to make normally active fish lethargic and slower to react, making them more open to predation if outdoors. Similar problems can occur in the aquarium if smaller or more sensitive fish are not able to hide or escape the curiosity of larger, hardier tankmates.  Read More »

Are you feeding Pure Flake? – Pure Aquatic Flake Food Debuts at That Fish Place

Pure Aquatic Cichlid FlakeThat Fish Place is. We are proud to introduce a new line of flake foods from Pure Aquatic.  In the rapidly growing product line from Pure Aquatic, the flake foods are the latest offering to hit the shelves here at That Fish Place.  They have a flake formulas suitable for almost any aquarium application.  All Pure Aquatic foods are made in the United States, and packaged fresh, for maximum quality.  Pure Aquatic Flake foods are Marine Biologist tested and approved, and are made with high quality ingredients and are fortified with vitamins and minerals for optimal health. Read More »

How to Set Up A Quarantine Tank

Every aquarist has a horror story about something terrible happening to their tank after adding something new. An outbreak of ich, a giant, scary bristleworm, or some other unwelcome hitchhiker that created panic and a scramble to get the aquarium back to its former condition. To avoid or prevent such situations we can’t recommend enough the assembly of a quarantine tank. For a few bucks and an hour of your time the isolation tank will likely save you the stress and anger of common issues that come with adding new stock for the duration of your aquarium keeping days.

Quarantine tanks, or “hospital tanks”, are a highly beneficial and typically underestimated part of keeping your fish healthy and happy. A good quarantine system will help you monitor the health of new fish before adding them to your aquarium, minimizing the spread of disease and ensuring that the fish is eating well.  The tank is also highly useful to treat sick or injured fish, a smaller volume of water means less medication, and the smaller tank helps you monitor the recovery. Even the simplest quarantine tank will pay for itself in money saved from reduced use of medications and fewer fish losses.  Whether you’re just getting started or you’re an aquarium veteran, this piece of equipment should be considered as essential as a good filter.

Materials

Quarantine tanks only require a few essential pieces of equipment. All you need for a successful tank are the following:

Tank – ten to twenty gallons is usually sufficient, depending on the size fish you plan on keeping

Filter – anything from a simple sponge filter to a small power filter

Heater – essential to tropical and saltwater systems

Simple shelter – not completely necessary, but will reduce stress by giving the fish a place to hide and feel more secure. Think PVC tube, old driftwood or an old plant or ornament.

You may also want to keep a small air pump and airstone on hand to apply during periods of medication.

Quarantine to Suit Your Needs and the Needs of Your Fish

Cichlid with IchThere are two main types of quarantine systems, permanent and emergency. Permanent systems are highly recommended because they are more stable, but emergency systems will work in a pinch if properly maintained.

Permanent Systems

Permanent systems remain set up and established all the time, whether a fish is being medicated or not. This allows for a stable environment closer to that of the main aquarium, but requires space and time for it to be maintained.  This type of quarantine tank should be equipped with a small power or canister filter, and  water conditions kept similar to the main tank.  Ideally, the filter should allow for easy removal of the chemical media (carbon, zeolite, etc) while medicating. The tank should be maintained regularly as well.  Frequent water changes and algae maintenance after cycling will keep the tank healthy and ready for new arrivals or ailing fish.  Hardy fish like danios or plecos (for freshwater) or mollies and damsels (for saltwater) will keep the tank cycled and stable between uses. When adding new fish to these systems, the fish should be slowly acclimated to the new tank, as water conditions will be different from their previous tank.

Emergency Systems

Not everyone has the space to keep a second tank set-up all the time. Keeping the necessary equipment for setting up a hospital tank (even if it is stored in the basement or garage) will help you be prepared if you have a problem.

The emergency quarantine tank is one that is set-up as needed. While not as stable as a system that remains established, these systems are good for isolating and medicating sick fish, or as a temporary home for a new or displaced fish.  Since these tanks are set up only as needed, a power filter is preferred, but not necessary.  A simple sponge filter attached to an air pump is sufficient. The tank should be filled with water from the existing aquarium to give the fish a somewhat more stable environment.  For this reason, a long acclimation is often not needed. These tanks also do not require starter fish to maintain the nitrogen cycle because they are cleaned out after each use. When cleaning, it is important to remember not to use harsh chemicals like Windex, or other cleaners.  If disinfection is necessary, a very diluted bleach solution can be used.  Just make sure to rinse the tank thoroughly after using the bleach water, and allow the tank to dry thoroughly before using it again.

Quarantine systems may seem like an unneccessary hassle or a waste of money, but anyone who has experienced an outbreak or any other major issue will tell you it’s worth your time.

Please let me know if you have any questions in the comments section below.

Thanks, Eileen

Pure Confusion – Finding the “Right” Water for Your Aquarium

Water SamplingOne common question that we receive about setting up new aquariums is about the most basic ingredient to the aquarium, the water that goes into it. There are a lot of terms that can get confusing when someone is trying to determine how to fill their aquarium and from what source. The options can be staggering – tap water, bottled water, prefilters, and so on – and starting with the right foundation can make all the difference, from the smallest betta bowl to the largest reef system.

Tap Water

This is probably the easiest and most accessible water source in most areas. Whether you get your water from a municipal water sources or from a well, it doesn’t get much easier than going to the nearest sink to fill your bucket or tank. Its ease is definitely a benefit, but keep in mind that municipal water sources will usually contain chlorine or chloramine to kill bacteria and well water sources may contain phosphates or other organics. Tap water can be used, but should be treated or purified to remove these materials before it goes into your aquarium. Read More »