Home | General (page 31)

Category Archives: General

Feed Subscription

Aquarium Slime: What is it and what to do about it?

“Slime algae” is a common problem with aquarists of all levels but getting rid of it can be tricky. The name “slime algae” is a misnomer and what may looks like a slime in your tank could be a number of different problems or, more commonly, a symptom of a number of different problems. The key to getting rid of it is to identify and eliminate the cause rather than just treating the symptom.

As with most aquarium problems, diagnosing this problem starts with testing your water quality. Water tests are just like vital signs at a doctor’s office and can point to or eliminate a lot of different problems in an aquarium. In addition to the four core water tests – Ammonia,Nitrite, Nitrate, and pH – testing the Phosphate level is also important in algae and algae-like issues like this. We’ll go into more detail later with how each parameter may be causing your problem and how they can be used to solve it.

Next, take a look at the “slime” itself…we’ll use these different appearances to help narrow down which you might be seeing in your tank. What color is the algae – red, green, black, brown, white? What is the texture like – thick and mat-like, a thin coating, wispy, cloudy? Do you notice it growing anywhere particular on the tank – only on the substrate or a certain ornament, in a circulation deadspot, only towards the top? Can it be easily brushed away? Are there bubbles forming beneath it?

Now to the different “slimes”…


Red Cyanobacteria in saltwater tank

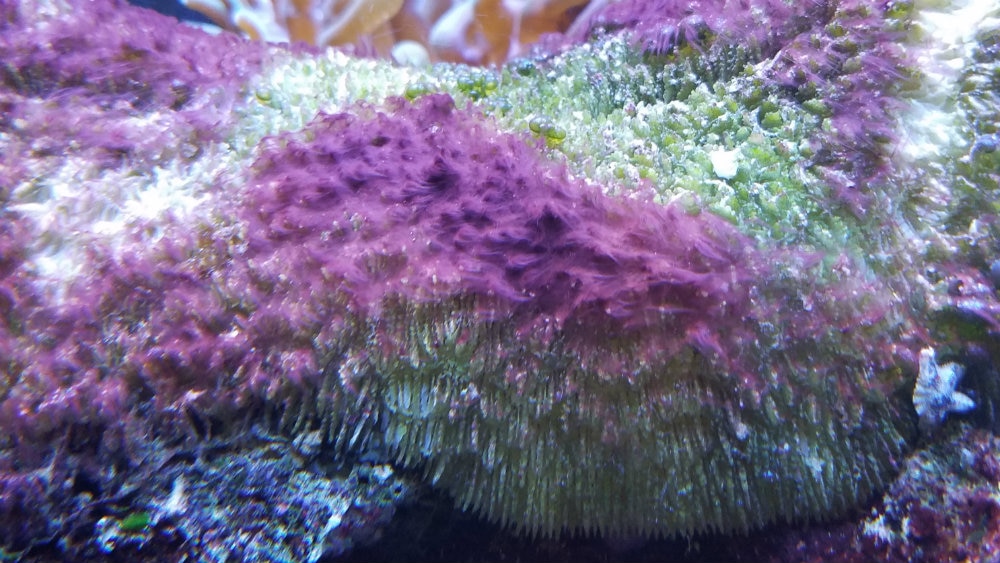
Thick and mat-like, usually dark red (especially in saltwater) or dark green (especially in freshwater). Bubbles form underneath the mats and it is easy to brush off of surfaces.

This is the most common “slime algae” that aquarists encounter but it isn’t actually an algae at all even though it may behave like one. This is Cyanobacteria (often simply called “cyano”). Cyanobacteria are bacteria that manufacture their own food and live in colonies — large enough for you to see them! It’s these colonies that cause trouble for aquarists. They are not necessarily blue-green but can be black, green, blue green, and the familiar dark red sheets covering many surfaces in an aquarium.

The first thing aquarists who find an unwanted colony of cyanobacteria in their aquarium want to know is how to get rid of it. Well, this is where it gets tricky. To eradicate the problem, the particular trigger for the cyano bloom must be identified and treated. Not every bloom is in response to the same trigger and while throwing a chemical at the problem will perhaps clear it up temporarily, it will come back, and it will be worse. Cyano has a few common causes:

  • High Nitrates (NO3-)/Dissolved Organic Carbon (DOC): These two parameters go hand-in-hand and are often interchangeable for an aquarist’s purposes. Nitrate and DOC is a food source of the bacterial side of the bacteria-algae. Sources include: fish slime, algae, bacteria, digested/uneaten food, metabolic waste, live food, some aquarium additives etc.
    • Key Appearance: The cyano with this cause will grow fairly indiscriminately anywhere in the tank where it gets light. This is usually the thickest mats of cyano.
    • Solution: This is best done by frequent water changes, good water movement (power heads and closed system circulation ) and (this is important!) a good protein skimmer (for saltwater tanks only). An undersized or ineffective protein skimmer, high waste loads, or a combination thereof will increase the dissolved carbon level. As a rule of thumb for skimmers; buy one that is rated for at least twice the size of your tank. It may take some adjusting but a properly functioning skimmer can remove ½ cup of thick organic scum from a tank a day. Also, watch what you feed. Feed once a day. If you wish to feed twice, simply split the amount in half – don’t feed twice as much food. If you feed grocery store bought seafood or are making your own foods, rinse all foods thoroughly as seafood sold for human consumption is treated with phosphates and preservatives to keep it fresher longer. (It’s true!) Avoid flake foods, these dissolve too fast – pellets and crisps are much better and more palatable.
  • High Phosphates (PO43-): This level is similar to the Nitrates above and may come from some of the same sources. It is used as a preservative in some foods as mentioned, but is usually the result of the water source. If you are using tap water, be sure to test the water before adding it to your tank, especially if it is well water or if you are in an area with a lot of agriculture and run-off. You can also check with your municipality if you use a municipal or “city” water source since Phosphate may not be removed in all areas.
    • Key Appearance: Similar to above.
    • Solution: Frequent water changes with Phosphate-free water. If your water source already has high Phosphate levels before it even makes it to your tank, consider installing an RO/DI (Reverse Osmosis/Deionization) Unit . This filtering system removes all impurities (including Phosphate, Nitrate, and DOC). If you already have an RO/DI Unit, make sure all the membranes are installed correctly and changed regularly. If you aren’t able to install your own unit, many stores like ours sell RO/DI water by the gallon. Filter medias are also available to help remove Phosphates faster than water changes alone.
  • Lighting:The food source for the algal side of the bacteria-algae is light. This is becoming less common as LED lighting is replacing older fluorescent aquarium lighting but if you are still using fluorescent bulbs, check on the age of your bulbs. Light bulb spectra (the “color” of the light) shift as they age, resulting more favorable conditions for photosynthesis to take place more vigorously. Older bulbs become more yellow in color and the “good” plants and algae can’t use this spectrum as well as the “bad” algae and cyano can.
    • Key Appearance: If lighting is the cause, you are most likely to see the cyano forming in the most brightly-lit areas of the tank with the most direct light. Since light wave penetrate differently through the water column, you may see a gradient in the cyano growth from top to bottom.
    • Solution: Replace old bulbs. If your fluorescent bulbs are older than 6-8 months, it is time to replace them. Even if they still “look” bright, the color will have started degrading. If you are able to, consider switching to an LED fixture. In addition to being much more energy efficient, they don’t age and lose their spectrum in the same way fluorescent bulbs will.
  • Poor Circulation: In this case, you may see cyano in only certain areas of the tank like corners or areas sheltered by rockwork. In these areas, the circulation is blocked or can’t reach sufficiently and any waste can build up before it can be removed by the filter. This provides a captive food source for the cyano.
    • Solution: Rearrange your tank or install powerheads or pumps to increase the circulation. Consider upgrading your filter as well if it isn’t powerful enough for the tank size.

Green Cyanobacteria in freshwater tank

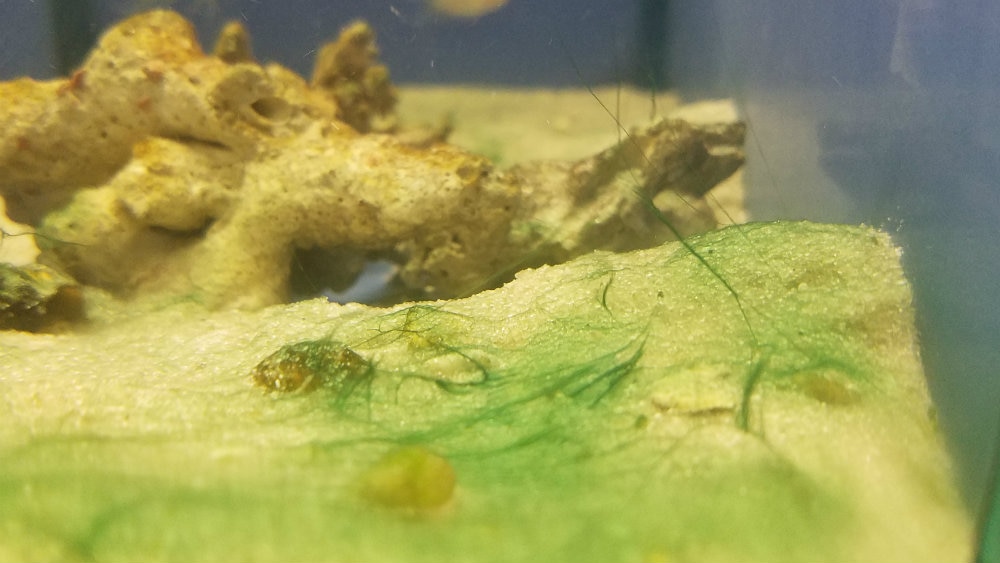
Thin and wispy sheets, usually on the substrate and especially in freshwater tanks. Usually green, brown, or blue-green

Trick question! This is also Cyano. This appearance is more common in freshwater tanks and in higher-flow environments where the Cyano can’t settle into thick mats. The same causes and solutions above still apply.

It should also be mentioned that there are chemicals to “treat” Cyano. Cyano is a gram negative (thin cell membrane) bacteria, much like most bacteria in the aquatic environment. A dose of Erythromycin will knock out the colony of slime quite quickly and this is the active ingredient in most Cyano chemicals on the market. However, since the nitrifying bacteria you need in your tank are gram negative as well, they will be affected also, either being killed or severely damaged. This treatment is more advisable in freshwater aquaria, but only with careful attention paid to water quality while treating. Like all antibiotics, if dosed frequently the cyano will develop a resistance. This should be a short-term fix only, and the problem leading to the cyano bloom in the first place still has to be addressed to eliminate it for good.


Diatom Algae in new tank

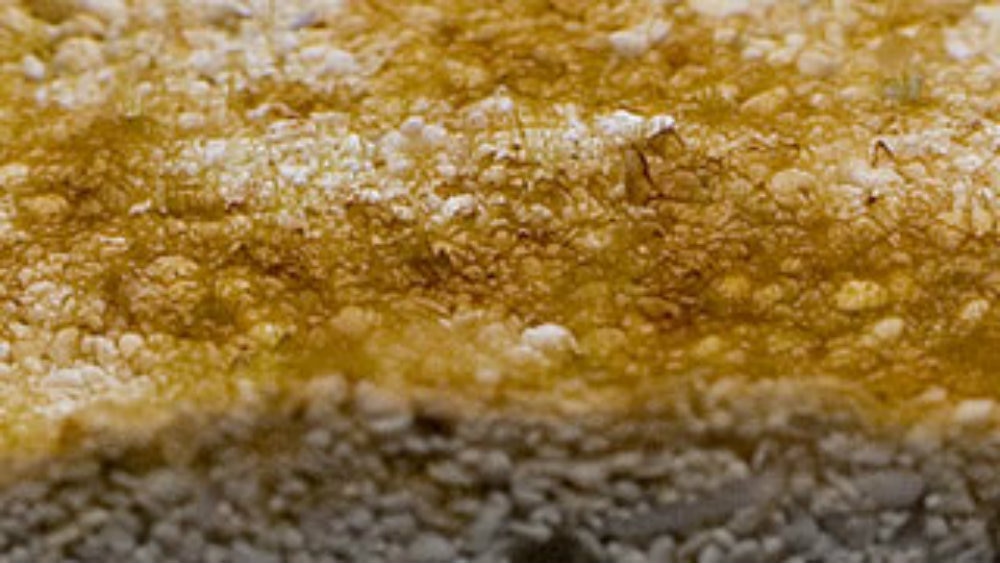
Thin light brown coating on exposed surfaces, especially in new aquariums (less than 4-6 weeks) or in tanks that have recently been “restarted” with a large water change (over 40-50%), medication, or other event

A few weeks after the tank has started cycling (after live rock, fish or a bacteria culture has been added), you may see a thin brown film covering the surfaces and sides of the tank. This film scrapes or wipes off easily and cutting back lighting doesn’t seem to affect it. No snails, hermit crabs or fish feed on it, but critters moving across the substrate or glass tend to stir it up enough so it “goes away.” So, what is going on at this point?

The “algae” you see is not a type of plant with cells like traditional green algae that most people think of. It is actually made up of diatoms, a type of phytoplankton whose cell walls are primarily made up of the mineral silicate. It blooms towards the end of the cycling process in a tank because of the imbalance of nutrients in the system but will usually die off on its own once the water chemistry in the tank stabilizes. This is what we commonly refer to as “New Tank Syndrome” (NTS).

  • Solution: Just wait! As tricky as it may be, the best tool to combat NTS is patience. Once the cycle progresses and the tank becomes established, this diatom bloom will exhaust itself and fade away on its own. You can clean the sides of the tank and stir up the substrate to break up the algae, but avoid the temptation to do water changes or add any algacides at this point….this will only cause the cycle to take even longer to finish and the NTS will keep coming back. Most tanks take about 4-8 weeks to cycle, depending on the bioload and size of the tank.
  • For more information, see our article Explaining the Nitrogen Cycle.

Fungus on driftwood

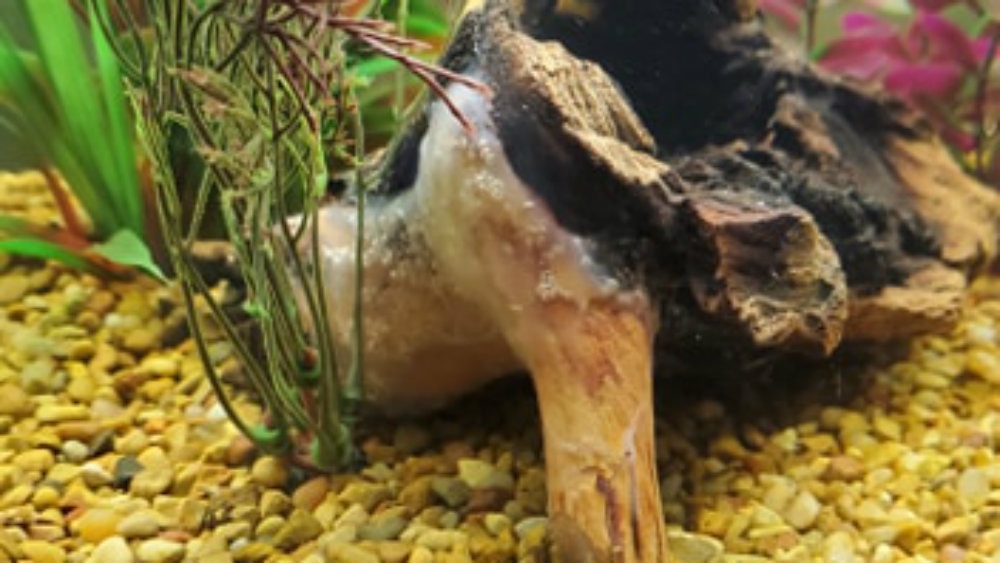
White, mold-like coating often isolated to a single ornament (especially natural ornaments like driftwood) in a freshwater tank

This is usually a sign of fungus or decomposition. If the “slime” is translucent in appearance, it is more likely to be a fungal growth. This is common on ornaments that may have been left outside and exposed to airborne spores, or on pieces washed with some detergents. If possible, remove the piece from the aquarium and scrub it thoroughly in a bucket of tank water or under warm running water. Spider Wood especially is notorious for becoming moldy when first added to a tank but will usually dissipate on its own in time.

If the “slime” is more opaque in color and easily brushes away, something is decomposing. If this is a natural material like a once-dried-out starfish or another animal, dispose of it…it will only continue to decompose and harm the water quality. If it is a harder object like a piece of wood, you can try cleaning it like described above but if it continues to soften or fall apart, it likely just isn’t a safe type of wood and should be replaced as well.

These are just a few of the most common “slime”-related issues we encounter often but are far from everything you may experience. We have come across some really unusual circumstances that have turned out to be related to something as seemingly unconnected as an oil-diffuser air freshener in an outlet near the tank. Feel free to let us know if you need help troubleshooting with your own tank!

Originally published September 9, 2008. Updated May 13, 2020.

Copadichromis Cichlids: Breeding Observations

Jose MendesPlease welcome back our “Cichlid Guy” Jose with an article on his experiences with Copadichromis species.

In Lake Malawi, there is a group of zooplankton feeding cichlids known to the natives as “Utaka”. They are the most important and most successful group in the lake. As where most cichlids are bottom dwellers, they have developed into an open water species. Utaka have developed several breeding techniques. Some breed in the rocky habitat and some construct sand bowers in the intermediate habitat, while others breed on the open sand. A fourth strategy is employed by Copadichromis chrysonotus. It is the only known Utaka that spawns in the open water.  In the hobby, young chrysonotus have been confused with young Copadichromis azureus. I have had the pleasure of working with both species, and they are different in size, color, mouth structure and breeding behavior. While the azureus bred under a cave (where he would lure the female with figure eight motions), the chrysonotus bred six inches above the rocks. As much as I enjoyed working with this fish, I have always wanted to breed a species that utilized bowers. The species I came across is Copadichromis eucinostomus. It is found in Lake Malawi, and was previously known as Haplochromis eucinostomus and Nyassachromis eucinostomus. It is found throughout the lake where it feeds on plankton, and its habitat consists of sandy areas in shallow water where males construct “sand castle nests”.

Spawning takes place in the early morning hours. After the eggs have hatched, mouth brooding females congregate into nursery schools and release their fry simultaneously in very shallow water.

After acquiring a wild pair from work, I put them into one of my 75 gallon aquariums. The tank was decorated with caves and a fine Aragamax sand substrate. The water conditions were as follows: Ph 8.8, a hardness of 200 ppm, and a temperature of 82 degrees. Their diet consisted of different flake foods supplemented by occasional feedings of frozen brine and mysis shrimp.

After about one month, the male started piling sand into a mound in a corner of the tank. His color then began to intensify. He went from silver with a light blue face to a light blue with yellow dorsal and caudal fins. From the lower jaw to the anal fin he was black. He then started courting the female to his nest, where she deposited at least two dozen eggs in the normal mouth brooder fashion. At about 27 days I noticed some fry hiding in the rocks. I then removed the rocks in order to catch the fry. I captured 17 fry less than 1/4” in length. The fry then went into a breeder net that was hung in the same tank. They were fed crushed flake and baby brine soaked in Selcon. They ate very well and never turned down food. After three weeks, I transferred them into a 10 gallon tank for growth. This species is generally peaceful at 4.5”. Their max length is 6”, although in the aquarium they can probably get larger. It is definitely worth keeping along with Aulonocara and certain Malawi haps. They are not common along the East coast, but you might be able to find them through forums or specialized clubs dealing with cichlids if we are not able to get them for you. Copadichromis are great looking fish with interesting breeding behaviors. I would recommend if you keep African cichlids to give this family a try, you won’t regret it.

Thanks Jose, as always we look forward to future tales of your experiences.

Artificial Reefs – Reconstructing Coral Reefs Worldwide

Please welcome back Eileen with some insight into artificial reefs.


construction of artificial reefWhen most people think of coral reefs, they picture crystal clear water, colorful corals and active schools of fish like those in places like Hawaii and Australia’s Great Barrier Reef. As pristine environments like these are becoming more and more threatened however, the face of the traditional “coral reef” is changing. Artificial reefs are becoming more popular as methods of saving the reefs, protecting the beaches they neighbor, increasing recreation and tourism and even creating more “farming areas” for those fish popular in the aquarium trade.


 Although artificial reefs are becoming more and more advanced as we learn more about what the marine life needs to thrive, the creation of reefs is nothing new. Ancient civilizations like the Persians and the Roman Empire created their own underwater barriers to help defend their harbors. Ancient fishermen were attracted to shipwrecks for the fish that would live in and around the wrecks. Japanese farmers created their own underwater farms to grow kelp in the the 1500’s and fishermen in South Carolina sunk unused timber to attract more fish to the coasts before the Civil War.


The “Osborne Reef” was one of the first efforts in the United States to create an artificial reef for recreational uses and to preserve and expand the existing coral reefs. This reef was used as the final resting ground for well over a million tires off of the coast of Fort Lauderdale, Florida and was considered one of the most ambitious and environmentally-friendly projects. Unfortunately, it didn’t work out that way. Marine life couldn’t grow in the tires and the tires themselves weren’t firmly anchored enough to save nearby natural reefs from damage during Florida’s active hurricane and tropical storm seasons. Though the original project had good intentions and the right idea – using items that would normally fill a landfill or have no other purpose – a multi-million dollar project is now underway to remove the tires from Osborne Reef.


Other projects have learned from the mistakes made with Osborne Reef and are now working to bolster the struggling coral reefs worldwide. The Rigs-to-Reefs program uses obsolete, unused or retired oil rigs to create new underwater reefs. The old rigs – most of which already have healthy reef populations around their bases from years of use – are either tipped onto their sides on the ocean floor or are cut in half, leaving the base intact and moving the top of the rig to a nearby location. New York’s Metropolitan Transit Authority (MTA) is also doing their part to save the reefs by sinking decommissioned, outdated subway cars. The stainless steel cars are cleaned, decontaminated, stripped of anything unsafe for the marine life, and then sunk to a new home in the Atlantic Ocean. Numerous decommissioned boats and ships of all sizes have also been scuttled and sunk to create new reefs, some of the most notable being the USS Oriskany and the USS Spiegel Grove, two naval vessels.


While projects like these are recycling structures that may have never normally seen the bottom of the ocean, other organizations are creating new structures designed specifically with marine life in mind. Reef Balls is an organization that creates structures for artificial reef use. They have over 20 styles and 10 sizes for various uses like coral reef and mangrove rehabilitation, oyster reefs, aquaculture farming, recreational purposes like fishing and snorkeling, erosion prevention, and scientific research. Companies can sponsor and build their own reef balls and government and private grants are also available. So far, over 59 countries have reef balls sunken off of their coasts. Companies like the Neptune Memorial Reef in Florida and Eternal Reefs, a Reef Balls’ sister company, are even creating artificial reefs using cremated remains to create underwater cemeteries.


Artificial reefs are becoming more and more common. They give new life to structures that would have been scrapped in the past and are helping to revitalize struggling reef communities worldwide. SCUBA divers, fishermen, surfers, and marine scientists are all already making use of these new reefs and as the aquarium hobby grows and expands, artificial reefs will become more important in sustaining populations for our own hobby. With the support of aquarium community and marine-loving citizens worldwide, we can turn terrestrial trash into new homes to brink some of the animals we love back from the brink.


Thanks, Eileen.  This is a really interesting topic.  Looking forward to your next article.

Image1

Image 2 attributed to: http://en.wikipedia.org/wiki/Image:Artificialreef.JPG

Bugs in My Aquarium? An Overview of Amphipods and Copepods

Please welcome back Desiree Leonard to That Fish Blog.

We as biologists at times take our knowledge for granted and forget that not everyone that is involved in the hobby is fully aware of all of the natural processes and progressions which occur in a saltwater aquarium.
Frequently we are contacted by frantic new aquarists with the following:  “I have little bug – like things crawling all over the rock in my saltwater tank.  I swear they weren’t there before.  What are they and where did they come from? Are they going to make my fish sick?  How do I get rid of them?”

Well, after talking the caller down off the ledge (so to speak), I give this answer:

In all likelihood, these are Amphipods 
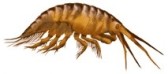
and Copepods; shrimp-like crustaceans that dwell in the substrate and rocks.  Because of the thousands of species contained within these groups in Class Crustacea, I am not going into detail about the taxonomy of these organisms, but here are some basic facts about these tiny crustaceans.
• There are both pelagic (free swimming), and benthic (bottom dwelling) bugs.
• Copepods occur in all types of aquatic ecosystems; freshwater, estuarine (brackish) and marine.
• Amphipods are mostly found in marine ecosystems, but there are some freshwater and terrestrial species.
• They are just a few of the tiny animal organisms that make up zooplankton, which contributes to the overall make up of plankton.
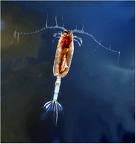
• These creatures eat phytoplankton (tiny plants and algae that also help make up plankton), small microzooplankton (the division of zooplankton that are smaller than 200 microns, or 1/127th of an inch in size), and detritus.
• Only a few of the thousands of species of copepods and amphipods known are carnivorous or parasitic, and these are rarely found in a saltwater aquarium system.
• For many saltwater fish and other marine species, copepods and amphipods are a primary food source, both in nature and in captivity.
• Because these tiny organisms are a natural part of the plankton food chain in the ocean realm, they are naturally going to occur in a saltwater aquarium environment. They are also micro-cultured as food for various species of adult marine animals, as well as used and tested as a food source in the research of culturing and rearing all kinds of tank-raised fry.
• Copepods and amphipods most often appear in closed aquarium systems after live sand and/or rock has been added.  They will “bloom” in the tank when the temperature is slightly warmer and a food source is available.

Another critter that may be seen is the isopod.  Also called pill bugs, fish lice and rolly-pollies, these animals are found in all parts of the marine environment.  Most isopods are free living and harmless, feeding on detritus and algaes, however, some are predatory, or parasitic, and dangerous to other reef aquarium animals.

How did these “pods” get into the tank?  Well, they’ve most likely been there for a while, just not in numbers large enough to notice.  These organisms are microscopic or plankton sized when they start out, so until they grow large enough to be seen with the naked eye, you don’t know they are there.   They hitchhike in on live rock and sand, and it is only after you have placed it into your aquarium that these organisms crawl out and make themselves at home.

If you have a large population of “pods” naturally, count yourself among the lucky few.  Many aquarists go to great lengths to create a large healthy population in either their tank or refugium.  Remember, these “bugs” are a natural part of a healthy aquarium ecosystem, as well as an important food source required by some species to survive.  In most cases they won’t hurt anything.  You shouldn’t have to do anything about them.  If you are concerned however, you can provide a natural predator which should keep the population under control.  Here is a list of species which pick at live rock, or sift substrate in search of these tasty morsels.  Keep in mind those fish marked with a * are species which feed on these bugs as their primary food source.  They are challenging to keep, requiring a well established aquarium with a consistently high “pod” population to live on lest they starve.  Keeping more than one of these obligate “pod” eaters in a tank will most likely lead to a depleted food source.
• *Mandarinfishes/Dragonets; Synchiropus splendidus Blue/Psychadelic Mandarin, Synchiropus picturatus Green/Spotted Mandarin, Synchiropus stellatus Red Scooter/Starry Dragonet
• *Sand sifting gobies; Valenciennea spp. Sleeper Gobies, Signigobius biocellatus Twinspot/Signal Goby
• Most Firefishes are planktivores which may occasionally pick these bugs from the rock.
• Most Angel, Butterfly, Hawk, and Wrasse species spend their days grazing on fauna found on the rocks, however, do not consider this as a primary food source – merely an opportunistic treat.
• Seahorses feed primarily on these “pods” but are not a beginner fish and should not be housed with other fish.
Amphipods, copepods, and isopods are just a few of the fun little hitch-hikers we get questioned about, and we enjoy helping our customers with identification issues.  If you should have other fun things pop up in your ecosystem, here are some other things you can do to help identify them:
• Buy some good invertebrate identification books for your saltwater reference library.
• Refer to marine invertebrate database and profile information, as well as photo galleries.
• If you have a personal saltwater Web site, create something like a “Can You Help Identify This?” page. You can display photos here and allow visitors to email back to you about them.
• Post a message in various aquarist forums asking for help with identification. If possible include a photo of good clarity, or provide a link to a Web page you may have created as described above.

*Photo Emailing Tip: When you email a photo to another aquarist asking for help with identification on something, be kind. Only send an image that is reasonably sized, and is clear enough to tell what you want identified including a “brief” description.

Thanks,

Until Next Blog,

Desiree

The Nitrogen Cycle and Conditioning Period in New Aquariums

Introduction

A thorough understanding of how water quality affects animal life is essential if one is to be a successful aquarist.  This is sometimes a bit difficult for beginners to accept, but please remember that it is a serious mistake to spend time learning about the habits and dietary needs of aquatic creatures while ignoring the “less glamorous” aspects of the hobby.  Once you understand water chemistry basics, your appreciation of how fishes and invertebrates survive in their environments will be heightened. 


The Nitrogen Cycle

The nitrogen cycle is a critical factor in the establishment of a crystal clear, well-balanced aquarium.  Poor functioning of the nitrogen cycle is undoubtedly the most common reason behind new aquarium failures.


Basically, the nitrogen cycle is a process by which nitrogen is converted to other organic compounds that are then utilized by plants and animals as food.  Nitrogen enters the aquarium via dead animals and plants, uneaten food, and the waste products of fish and invertebrates.  The most toxic nitrogenous compound that is added to aquariums in this manner is ammonia.  Ammonia occurs in two forms, ionized and un-ionized, with the un-ionized type being extremely toxic to aquatic organisms.  The proportion of the total ammonia that is un-ionized rises as the water’s temperature and alkalinity increases.


Bacteria and the Nitrogen Cycle

Two types of bacteria control the functioning of the nitrogen cycle.  These bacteria are aerobic, which means that they require oxygen in order to survive.  Bacteria populations develop and thrive on substrates that are exposed to oxygenated water, such as gravel and the filter pads and carbon within filters.


The process by which aerobic bacteria convert ammonia to less harmful compounds occurs in two phases. Nitrosomas bacteria convert ammonia to compounds known as nitrites. Nitrites, while dangerous to aquatic organisms, are less toxic than is ammonia.  In the second stage of the process, bacteria of the genus Nitrobacter utilize these nitrites as food, and in doing so convert the nitrites to nitrates.  Nitrates are the end product of the nitrogen cycle, and are the least toxic of the compounds involved.


Nitrogenous bacteria (the name given to the various species of bacteria that feed upon ammonia-based compounds) exist in huge populations in natural water bodies and in healthy aquariums.  Until such are established in your aquarium, its levels of nitrogen-based compounds will be toxic to nearly all fishes and invertebrates.


The time it takes for healthy populations of nitrogenous bacteria to become established in an aquarium is often referred to as the “conditioning period”. Its actual timetable varies greatly depending upon the unique characteristics of each aquarium and of the animals therein, but usually falls in the range of 1-6 weeks.


Please bear in mind that water clarity is not an indicator of the functioning of the nitrogen cycle.  The only sure way to monitor the cycle is via frequent testing of the water to determine the levels of ammonia, nitrates, and nitrites (please see below).


Altering the Nitrogen Cycle

Your aquarium’s conditioning period may be shortened by the addition live aerobic bacteria.  I have had good experience with Biozyme Freshwater and Biozyme Saltwater, and strongly urge you to use either with all new aquariums.  Products such as Coral Vital LSB Pro, which accelerates the growth and reproduction of bacteria in marine aquariums, should also be considered.


You can also help the process along by adding filter material from a well- conditioned, parasite-free tank into the filter of your new aquarium.  Natural materials such as “live rock and “live sand” also host beneficial bacteria and offer another option.


In the past, it was standard practice to use hardy fish, such as domino damselfish in marine aquariums or guppies in freshwater aquariums, to hasten the conditioning period (their waste products started the process and provided food for bacteria).  However, additives such as those mentioned above are more effective and infinitely kinder, as many of the fish subjected to this process did not survive.


When cleaning your filters, always retain a bit of old filter medium (carbon, floss) and add this to the clean filtering material.  In this way, you will introduce aerobic bacteria into the newly-cleaned filter.  These will reproduce rapidly and greatly increase filtration effectiveness.


Please be aware that the addition of packaged bacteria does not eliminate the need for a proper conditioning period. Water quality must still be monitored carefully, and animals should be introduced to the aquarium in small numbers. 


Measuring the Levels of Nitrogenous Compounds

The frequent use of test kits is essential during the aquarium’s conditioning period, and on a regular basis thereafter.


Ammonia should be tested daily until you notice a sudden decrease in its level.  This decrease signals the presence of Nitrosomas bacteria.  Nitrate levels will then follow the same pattern, as the Nitrobacter bacteria become established.


The conditioning period may be considered at an end once the nitrate levels drop substantially.  You may now begin to introduce fish and invertebrates into their new home.  Be sure to add animals in small quantities, so as not to overwhelm the nitrifying potential of the bacteria present, and observe them carefully for signs of stress.


The pH level should be checked often as well, since the water may become acidic during the conditioning period.


I am very interested to hear about your successes and challenges in establishing new aquariums, and will be sure to pass along your information to my readers in future articles.  Thanks, until next time, Frank.


An interesting technical article on the role of nitrogenous bacteria in natural marine habitats is posted at:

http://aem.asm.org/cgi/reprint/60/5/1554.pdf