Home | Saltwater Aquariums | Reef Aquariums (page 22)

Category Archives: Reef Aquariums

Feed Subscription

Contains articles featuring information, advice or answering questions regarding reef aquariums, livestock or equipment.

Top 10 Most Overlooked Saltwater Aquarium Tankmates

Eileen here. Thanks to movies like Finding Nemo, Ocellaris and Percula Clownfish, Hippo Tangs, Yellow Tangs and starfish have become must-haves in many home aquariums and we all know that damsels are good hardy fish for aquarists of all levels. But what else is there? A LOT!! When customers ask for my opinion on good fish and invertebrates for their aquariums, I like to recommend something a little out of the norm. Clownfish and damsels are great, but there are a lot of other fish and inverts that deserve a little more respect! Here are a few of my favorites….

1. The “other” clownfish

Forget the standard orange-fish-with-three-white-stripes; there are a lot of other clownfish out there that don’t follow this pattern but are just as hardy and attractive. The Saddleback Clownfish is either brown or black with one white stripe over its eyes like a mask and another that covers its back like…you guessed it, a saddle. The Orange Skunk and Pink Skunk Clownfish are two more that break the mold. Each has a light, pastel body with a thin white stripe along their back. These two are more peaceful and stay smaller than other clownfish species – perfect for smaller or more docile tanks. Nemo is great, but give his “cousins” some attention too!

2.  Bannerfish

Bannerfish are closely related to butterflies but are in a category all their own. The most common type is the Longfin Bannerfish, also known as the Poor Man’s Moorish Idol. This fish looks a lot like but is a whole lot hardier (and cheaper) than the rare and touchy Moorish Idol (y’know, Gill from Finding Nemo?). They aren’t exactly “Reef Safe” and may nip at some polyps, but bannerfish are great for fish-only community aquariums.

3. Cardinalfish

Peaceful. Schooling. Reef Safe. Hardy. Might even breed in your aquarium. What more could you want? Most cardinals stay under about 4 inches and some barely reach two inches so they can be kept in even small aquariums. Most of them can also be kept in small groups so instead of having just one or two big fish, you can have the color and activity of a small school!

4. Hawkfish

Hawkfish earn their name by perching on rocks and corals, then swooping down on an unsuspecting meal (NOT good tankmates for shrimp or tiny fish), but most of the time they hop around the tank from perch to perch. Tons of personality, generally friendly towards anything too big to eat, and easy to feed. You can find hawkfish in lots of different colors and variety and with maximum sizes ranging from two to twelve or more inches.

5.  Rabbitfish and Foxfaces

These fish are some of the hardest-working but most overlooked fish in the trade! They graze on lots of different types of algae, including the notorious hair algaes and bubble algaes, and will feed on most other aquarium foods as well. They don’t bother inverts or smaller fish and most bigger fish will leave them alone. Just don’t touch their dorsal spines – they’re venomous.


6. Hamlets

Not many fish can get along in larger, more aggressive community tanks, but hamlets are one of them! These fish aren’t for community tanks with small tankmates, but they are interesting and unique additions to larger community tanks with fish like angels, tanks, groupers and triggers.

7. Jawfish

One of my personal favorites! Jawfish might not be the most visible fish for your aquarium but they may be the most fun to watch. Many jawfish will decorate the entrance to their burrow with larger pieces of substrate or shells and will spend their time guarding their little threshold while darting in and out for food. Might not be as flashy as other fish, but a whole lot more fun!

8. Polyps and Mushrooms

These are not so much overlooked as underappreciated. Sure, some hardcore collectors will pay $50+ per polyp of some rare zoanthid polyps, but most polyps and mushroom are just recommended as starter corals or as something for new aquarists to start with as they dabble in the reef side of the hobby. Polyps and mushroom can be so much more! They come in lots of different colors and varieties and will usually spread around your aquarium to form a living mat over the rocks and even on the glass. Polyps and mushrooms both are usually sold on various sizes of rocks with one or more types on a single rock. Easy to care for, undemanding, easy to propogate…polyps and mushroom deserve more respect than we give them!

9. Gorgonians

Yellow Deepwater GorgonianAquarists with low light can be very restricted with what types of corals they can keep in their tank. Gorgonians are an excellent alternative. Some species like bright green Encrusting Gorgonians benefit for decent light, but most species are strictly filter feeders and do not need light to survive. The branching forms like the Yellow Deepwater Gorgonian or fancy Sea Fans have a recognizably “coral-like” appearance with soft branches that can move and sway in the flow of your tank.

10. Leather Corals

Leather corals aren’t as popular as their flashy stony coral counterparts but they can be just as dramatic in a reef tank. Like the polyps, mushroom, and gorgonians, most leather corals are undemanding and don’t need a lot of extra care. With the exception of the rare bright yellow or green leather, most leather are shades of tan, pink and purple and don’t need a lot of light or even pristine water to thrive.

Until Next Time,

Eileen

Bristleworms. The Good, the Bad, the ITCHY!!

Hi, Craig here with some cool stuff about Bristleworms.

It’s late in the evening, you have gotten home after the lights on your reef tank have gone out. Walking by the tank you look down and notice a little fuzzy worm poking out of the rocks. Startled, you press your face close to the tank and …ZIP!!… the little worm is gone. Thinking to yourself that you have a cool new critter in your tank, you forget all about the worm. Days go by… weeks go by… another late night at work and you again arrive at home to a darkened tank. Looking into the aquarium again, you see dozens of little worms now! Crawling everywhere! Now you are a bit concerned. What in the world are these things?! And why are there so many?! And how does one get rid of them?!

What you have discovered are members of a large class of worms called Polychaete worms. There are probably more polychaete worms on this planet than virtually any other creature. Feather duster worms and Christmas tree worms as both included in the class Polychaeta. Some Polychaete worms live over hydrothermal vents in the deepest reaches of our oceans and are amongst the most heat tolerant animals on the planet. Another species of Polychaete worm lives over cold seeps in the ocean and may be the most long lived animal on Earth, reaching perhaps 250 years of age. Most are marine worms, but some species have even adapted to living in humid terrestrial environs.

The little boogers you have just discovered in your tank are very common, most likely from the genus Hermodice or Eurythoe, and often carry the common names of “Bristle worm” and “Fire worm.” These names are derived from the rows of needle-like bristles that line the sides of their bodies. These bristles are often venomous and can produce localized swelling and, in some cases, extreme burning sensations. There is some debate as to the danger of these creatures in the home reef aquaria. While there is no doubt that many species of bristle worms will predate upon soft corals, gorgonians, and tridacnid clams, some of the smaller members of the genus Eurythoe can certainly be counted as some of the best detritivores in the business.

So how do you decide if you have one of the big nasties or one of the little janitorial worms? That will take a little research. I have seen what may literally be dozens of different species. Each one a little different than the other. From the foot long Hermodice carunculata that is white to grey in colour with white spines, to the small red-headed Eurythoe spp. that are rarely more than 7cm in length. If you have tiny worms that are white to black with red heads, chances are they are actually doing you a lot of good. However, even in large numbers, the little guys could become a nuisance. If, on the other hand, you have one of the large white or pink ones… well… those eat things. Trapping and population control through predation are almost always good ideas. Which method you choose will depend greatly on the size and number of the worms.

Six Line WrasseIf you have smaller species of Polychaete worms, it is very likely that you will be able to control their population size by using various natural predators. Of the different creatures used to control bristle worms, there are a handful that are stand outs. At the top of the list are the Pseudocheilinus wrasses. Six line wrasses (Pseudocheilinus hexataenia,) the disappearing wrasse (Pseudocheilinus evanidus,) the Twelve line wrasse (Pseudocheilinus tetrataenia,) and Mystery wrasses (Pseudocheilinus ocellatus) are all well known for their appetites towards bristle worms and flatworms. Generally considered to be well-mannered in community reef tanks, these wrasses make a very beautiful and curious addition to any tank. Another genus of fish that is known for it’s ability to eat small bristle worms are the dottybacks. There are a handful of Pseudochromis that have shown consider skill and appetite when it comes to eating bristle worms. The most notable are Pseudochromis fridmani, Pseudochromis sankeyi, and Pseudochromis springeri. Each of these species is a very inquisitive and entertaining addition to a reef tank. While most Pseudochromis show a very high level of aggression to tank mates, these three species have shown to be quite tolerant of neighbours. Any of these fish would make a very beautiful and prized inhabitant to your home aquaria. Another excellent, if somewhat voracious, predator of bristle worms is the arrow crab. Members of the genus Stenorhynchus are very well known to eat bristle worms. Using their very long claws to extract worms from rockwork, these unusual crabs eat the worms as though they were eating a fuzzy piece of spaghetti. The only negative to these crabs… if there aren’t any worms around… they will catch whatever they can to keep themselves fed. Other crabs, shrimp, and small fish are all on the menu if the arrow crab gets hungry enough. Continuing with the invertebrate solution for bristle worms, there is a particular genus of shrimp that can be somewhat helpful in controlling populations of the smaller worms. The coral shrimp of the genus Stenopus have been noted to eat bristle worms in modest numbers. These shrimp are very attractive and can be kept in mated pairs. This ability to keep them in pairs makes the coral shrimp a really wonderful member of your aquarium. In regards to keeping the arrow crab or the coral shrimp, it must be noted that some individuals will preferentially take to eating prepared fish food rather than putting the effort into hunting worms. But, really, who can blame them when they know that there is a free meal coming to them? No matter what your choice in biological bristle worm control, you will no doubt be pleased with the addition of a beautiful and interesting new resident to your reef.

Having just spent an entire paragraph on predatory control of bristle worm populations, it should be stated that predation upon large specimens is virtually impossible, so trapping them would be the most efficient way of removing them from your aquarium. There are several commercially available traps, but almost all of them are for smaller worms. To make a trap that is capable of catching a larger worm take a little bit of imagination as well as a little McGuyver. Using 1/2″ PVC, cut an 8 inch length. Then, cut two small pieces of nylon window screening and rubberband it on each end. On one end, cut a small slit to allow for entry by the worms. Before you submerge the tube into the water, you will want to place a piece of shrimp all the way inside the tube as far as you can get it. Leave the tube in overnight. Check the tube first thing in the morning and see what you’ve got! It may take a handful of tries, but this method will often bring results.

You may be tempted to try to remove the worm with a set of tweezers or tongs. Take care in doing this… for if the worms breaks into pieces, each of those pieces can form a fully functional worm! With patience, either technique mentioned in the above paragraphs should yield results in controlling or eliminating your bristle worm population. Remember that small numbers of the small Eurythoe spp. actually considered somewhat beneficial, but if you keep soft coral and tridacnid clams, you may be better off having some sort of control in the tank. Another helpful tip in controlling populations, keep your tank on a regular, weekly water change schedule. Weekly 15% water changes will help keep organics down to a minimum, thus keeping the food source for bristle worms down to a minimum. So, if you ever encounter any of these little beasties and want to be rid of them, try a trap or a natural predator. If, on the other hand, you decide to keep your new critters, you will have some very curious and odd pets to observe! The shy nature of these worms can even become somewhat endearing if you give them the chance!

Coral Propagation for Beginners

Dave here. Coral propagation, or fragging as we reef geeks refer to it, is the process of creating new coral colonies from a parent colony. Over the last several years, techniques, products, and general knowledge of the practice rapidly evolved to where it is quite common. As little as five years ago it was something new and exciting, or even scary depending upon your perspective. The thought of cutting pieces off of your prized coral colonies may seem intimidating at first, but it is actually quite safe, and the fragment has an excellent chance of survival if properly handled. Some corals are more easily fragged, and are better suited for the beginner, than others.

These types are what I will focus on for this blog. In general branching stony corals, and Zoo polyps, are among the easiest and most desired corals to frag. If you look around for your local reef or aquarium clubs, many of them will have frag swap meets, so that hobbyists can sell and trade frags with other hobbyists. It is a really great way to promote coral conservation: the more fragged corals you keep, the fewer corals need to be collected from the reefs. Frag swapping is also a great way to share knowledge, and increase the survivability of captive corals. Propagated corals are hardier, and often more colorful, than wild corals. They have been raised in artificial conditions, and will usually keep their color. Wild corals can change color dramatically when adjusting to captive conditions.

There are a few basic items that you will need in order to start coral fragging. First, you need a suitable coral (Duh!). You should try to use only healthy coral colonies for fragging, as it will increase the survivability of both the parent and the cutting. While much fragging is done with damaged or dying corals in an attempt to save something, this is a much less successful way to produce coral frags, and should only be done as a last resort for the specimen. Fragging healthy corals will lead to a much better result.
Second, you will need something to mount the coral to, and there are several options here. Live rock rubble makes excellent, natural looking frags, but can be difficult to get in volume, and can be difficult to keep stable while the frag is securing itself. Commercially available Plugs and Disks, while less attractive initially, allow for quick and easy attaching. Using Plugs and Disks will also allow for easy volume production, as they will either fit snugly into egg crate material, or flat surfaces, so that you can grow out many frags, securely, in a small area. While we are on the subject of eggcrate, for those of you unfamiliar with the material, this can be found any home improvement center in the lighting section. Eggcrate can easily be cut and built into shelves and platforms to mount your frags for establishment and growth.
Next, you will need glue for attaching your cuttings to your rubble, plug, or disk. “Super Glue”,or Cyanoacrylate Gel is the glue of choice. This glue is harmless to the coral, dries quickly, and is easy to use. The glue is available in clear and pink colors, as well as different thicknesses for the job at hand. Your other choice is epoxy putty, this works well for some stony corals, and is well suited for use on rubble rock. Epoxy Putty is also available in several colors.

Finally, you will need cutting tools. Several types of cutters, scalpels, and snips are available on the market. Depending upon the type of coral being cut, different tools will work best, so it is best to have an assortment of tools at your disposal. What you may like to use may not be what I like to use, but if it suits your purposes, go for it. In general snips, shears, and cutters should be used on branching stony corals, and scalpels, razors, or chisels work best for Zooanthid polyps and encrusting corals.
You should strongly consider using safety goggles and rubber gloves, as many of the secretions and fluids that are produced when cutting corals can be very irritating, and even dangerous, to your skin and eyes. Protection is very important.

Once you have all the tools you need, the fragging process is easy. For stony coral, it is as simple as cutting the tips off of one or more of the branches of your parent colony and gluing the freshly cut tip to your plug or piece of rubble. Don’t be shy about the amount of glue that you use, you want to make sure that it stays attached so it can grow onto the plug. You can remove the coral from the water to perform this step. The parent colony will heal over and grow a new tip, or tips. The freshly attached frag will, over a period of weeks or months depending on species, grow over the glue and firmly attach to the plug.

Zoo Polyps can be removed from a parent colony by carefully removing them from the rock they are attached to with a scalpel or sharp chisel. Just a few full polyps are all that you need to start a new colony. With each removed polyp, a new frag colony can be started. Attach the cut polyp to a disk or piece of rubble rock, and then the polyp will attach and multiply on its own. Just as with the stony coral frag, the zoo polyp frag will grow over the glue and cover the disk or rock over a period of weeks to months.

This process can be repeated over and over, allowing you to produce many frags over time. Most people will choose to do this with just a few corals, and use these new frags to trade or sell for different species for their displays.

Interested in a more hands-on and guided approach? Stop by a frag swap! That Fish Place – That Pet Place in Lancaster, PA hosts one with the Reef Conservation Society Bi-annually. If you’re not in the area, Googling ‘frag swap’ is sure to yield one near you.

Until next blog

Dave

TFP 700 Gallon Reef Tank

Hi, Dave here, I thought that I would do some blogs about some of the things that I have been working on here at TFP. I will start with one of my projects that I have been working on this year, the remodeling of our Custom Design Center in our retail store. The Custom Design Center is our showcase of aquarium displays. We originally set up the displays about four years ago, and it is time to give them some updating and upgrading. The first tank that we decided to give a facelift is the centerpiece of this display, our 700 gallon in-wall aquarium. Originally set up as a FOWLR (Fish Only With Live Rock, for you non reefers) and a few soft corals, we decided that our centerpiece should be a full blown reef. Putting this display together has been a blast, we really took our time with thinking out the design, and the components to the tank, then over a period of a couple months earlier this year we got the tank up and running just prior to our annual anniversary sale this past April. Those of you who made the trip out here this year got to see the tank after it had been running for about two weeks. We had a good starting point, as we tore down the original tank, and several small reef displays in the store, keeping all the cured live rock and some of the corals, fish, and Inverts for the new tank.

The Tank

The tank itself is a custom 700 gallon Oceanic that measures 120”x 36”x36”. As with all the large custom Oceanic tanks, it has a powder coated stainless steel frame, an ABS, HDPE and glass laminate bottom for extra strength, and ¾” glass panels. Ours has two rear overflow boxes, as well as 4 holes in the bottom panel for a closed loop flow system (I will cover this more in the filtration section) As you can probably guess this is a very heavy tank, I think its dry shipping weight was about 2,200 lbs when crated. Not something that you and your buddies are going to muscle into place, all moving was done with a forklift.

Lighting
700 Gallon Reef Tank Lighting From Above
Knowing we wanted to set up an SPS dominated reef tank that was 36” deep, proper lighting was going to be something that we needed to take care of. The guys at Ice Cap, Inc. really stepped up and helped us make sure that our lighting was top notch, and would allow us to keep whatever we wanted. We chose the new Ice Cap 400w HQI pendant lights, the tank has six of these, and the tank also has six 39 watt HO T5 actinics. All these are powered by Ice Cap electronic ballasts.

As you can see in the pictures, there are three openings in the top of the tank, each opening has two 400w halides and two HO T5 actinics. Each set is hinged above the tank on a hinged rack system that I designed, that allows you to flip the lights up a section at a time to work on that area of the tank. This works really well, it allows you to leave the other 700 Gallon Reef Tank at That Fish Place Lights Downsets of lights on so that you can see in the section that you are working on. On a tank that is 10’ long, that you need a ladder to look into the tank, this comes in handy.

Filtration

There are several parts to the filtration system on the aquarium. There is a Custom Trigger systems sump and protein skimmer, a closed loop circulation system, and a 60 gallon refugium/frag/quarantine tank.
The custom Trigger Systems filtration system that we had custom made for the filtration room that is behind the aquarium is a beast. The sump measures 60”x28”x20”, one end has 4 built in filter socks. 700 Gallon Reef Tank at That Fish Place Protein SkimmerThe protein skimmer recirculates on this section, so it has a constant supply of raw surface water. Then there are a series of baffles, an open center section, another series of baffles, and then a third section where the return pump draws water from. The protein skimmer is also a custom Trigger Systems design that is matched to the sump. It is a dual Beckett injector design that is 10” in diameter, and 44” tall, it works great, lots of thick dense foam. The skimmer is run by a Sequence Marlin pump, and the system return pump is a Sequence Hammerhead.

700 Gallon Reef Tank at That Fish Place Closed LoopThe Closed Loop system sits underneath the aquarium. There are four holes drilled into the bottom of the aquarium, one serves at the drain that feeds the pump, the other three are returns that circulate the return water throughout the live rock structure in the tank. The closed loop pump is another Sequence Hammerhead pump that puts out about 5,000 gph. Each return in the tank splits into four lock-line modular pipe sections with nozzles, which allowed us to direct flow wherever we want it. This is all hidden inside the rock work in the tank, it is hard to see any of it at all.

There is also a 60 gallon cube plumbed into the system that is used for a refugium and frag tank. This has a deep sand bed with a lot of live rock rubble on the surface, we also use this tank to house new fish before they are introduced into the aquarium.
There is also a one horsepower ESU chiller and an 80watt AQUA UV sterilizer that are plumbed into the system. The chiller, sterilizer, and refugium are all fed water from the main circulation pump.

Live Rock and Livestock

700 Gallon Reef Tank at That Fish Place RefugiumThe tank has about 1,000 pounds of live rock, that is a mixture of several types of Tonga and Fiji rock. We tried to use as many really large rocks as possible, several are 70 – 80 lbs each. The live rock was strategically placed to hide as much of the closed loop system as possible, and at the same time leave a lot of open space to give it a more natural appearance. I really wanted to avoid the wall-of-rock look that so many aquariums have.

One of the other things that I really wanted to do with this aquarium was to use as much cultured coral as possible, and limit the amount of wild coral went into the aquarium. This meant sacrificing size for the initial specimens in most cases, but I felt it was important to promote aquacultured and maricultured corals where possible. Of the over 70 corals that are currently in the aquarium, over 50 of them are from a cultured or captive source. Looking at the tank it does not look like there are that many corals in there, mostly because they are all fairly small at this point.

700 Gallon Reef Tank at That Fish Place CoralI will try to post some more pictures of the tank as time goes on, so that you can see the corals as they grow and fill in. This was another reason that I left so much open space in the aquarium when we did the rock work, I wanted to make sure that the corals had plenty of space to grow.
There are a few more tanks that we will be reworking in the custom design center here over the next couple months, I will post some blogs about them as they are completed. I hope that you found this interesting, let me know and I can do more blogs of this type in the future.

Until next time,
Dave

Bugs in My Aquarium? An Overview of Amphipods and Copepods

Please welcome back Desiree Leonard to That Fish Blog.

We as biologists at times take our knowledge for granted and forget that not everyone that is involved in the hobby is fully aware of all of the natural processes and progressions which occur in a saltwater aquarium.
Frequently we are contacted by frantic new aquarists with the following:  “I have little bug – like things crawling all over the rock in my saltwater tank.  I swear they weren’t there before.  What are they and where did they come from? Are they going to make my fish sick?  How do I get rid of them?”

Well, after talking the caller down off the ledge (so to speak), I give this answer:

In all likelihood, these are Amphipods 
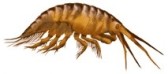
and Copepods; shrimp-like crustaceans that dwell in the substrate and rocks.  Because of the thousands of species contained within these groups in Class Crustacea, I am not going into detail about the taxonomy of these organisms, but here are some basic facts about these tiny crustaceans.
• There are both pelagic (free swimming), and benthic (bottom dwelling) bugs.
• Copepods occur in all types of aquatic ecosystems; freshwater, estuarine (brackish) and marine.
• Amphipods are mostly found in marine ecosystems, but there are some freshwater and terrestrial species.
• They are just a few of the tiny animal organisms that make up zooplankton, which contributes to the overall make up of plankton.
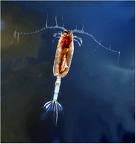
• These creatures eat phytoplankton (tiny plants and algae that also help make up plankton), small microzooplankton (the division of zooplankton that are smaller than 200 microns, or 1/127th of an inch in size), and detritus.
• Only a few of the thousands of species of copepods and amphipods known are carnivorous or parasitic, and these are rarely found in a saltwater aquarium system.
• For many saltwater fish and other marine species, copepods and amphipods are a primary food source, both in nature and in captivity.
• Because these tiny organisms are a natural part of the plankton food chain in the ocean realm, they are naturally going to occur in a saltwater aquarium environment. They are also micro-cultured as food for various species of adult marine animals, as well as used and tested as a food source in the research of culturing and rearing all kinds of tank-raised fry.
• Copepods and amphipods most often appear in closed aquarium systems after live sand and/or rock has been added.  They will “bloom” in the tank when the temperature is slightly warmer and a food source is available.

Another critter that may be seen is the isopod.  Also called pill bugs, fish lice and rolly-pollies, these animals are found in all parts of the marine environment.  Most isopods are free living and harmless, feeding on detritus and algaes, however, some are predatory, or parasitic, and dangerous to other reef aquarium animals.

How did these “pods” get into the tank?  Well, they’ve most likely been there for a while, just not in numbers large enough to notice.  These organisms are microscopic or plankton sized when they start out, so until they grow large enough to be seen with the naked eye, you don’t know they are there.   They hitchhike in on live rock and sand, and it is only after you have placed it into your aquarium that these organisms crawl out and make themselves at home.

If you have a large population of “pods” naturally, count yourself among the lucky few.  Many aquarists go to great lengths to create a large healthy population in either their tank or refugium.  Remember, these “bugs” are a natural part of a healthy aquarium ecosystem, as well as an important food source required by some species to survive.  In most cases they won’t hurt anything.  You shouldn’t have to do anything about them.  If you are concerned however, you can provide a natural predator which should keep the population under control.  Here is a list of species which pick at live rock, or sift substrate in search of these tasty morsels.  Keep in mind those fish marked with a * are species which feed on these bugs as their primary food source.  They are challenging to keep, requiring a well established aquarium with a consistently high “pod” population to live on lest they starve.  Keeping more than one of these obligate “pod” eaters in a tank will most likely lead to a depleted food source.
• *Mandarinfishes/Dragonets; Synchiropus splendidus Blue/Psychadelic Mandarin, Synchiropus picturatus Green/Spotted Mandarin, Synchiropus stellatus Red Scooter/Starry Dragonet
• *Sand sifting gobies; Valenciennea spp. Sleeper Gobies, Signigobius biocellatus Twinspot/Signal Goby
• Most Firefishes are planktivores which may occasionally pick these bugs from the rock.
• Most Angel, Butterfly, Hawk, and Wrasse species spend their days grazing on fauna found on the rocks, however, do not consider this as a primary food source – merely an opportunistic treat.
• Seahorses feed primarily on these “pods” but are not a beginner fish and should not be housed with other fish.
Amphipods, copepods, and isopods are just a few of the fun little hitch-hikers we get questioned about, and we enjoy helping our customers with identification issues.  If you should have other fun things pop up in your ecosystem, here are some other things you can do to help identify them:
• Buy some good invertebrate identification books for your saltwater reference library.
• Refer to marine invertebrate database and profile information, as well as photo galleries.
• If you have a personal saltwater Web site, create something like a “Can You Help Identify This?” page. You can display photos here and allow visitors to email back to you about them.
• Post a message in various aquarist forums asking for help with identification. If possible include a photo of good clarity, or provide a link to a Web page you may have created as described above.

*Photo Emailing Tip: When you email a photo to another aquarist asking for help with identification on something, be kind. Only send an image that is reasonably sized, and is clear enough to tell what you want identified including a “brief” description.

Thanks,

Until Next Blog,

Desiree